Monday, May 14, 2012

Just sharing a Weight Watchers Points Plus Recipe
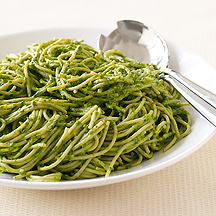
Pasta with Creamy Spinach Pesto
Image of  Pasta with Creamy Spinach Pesto
Weight Watchers Recipe
 6PointsPlus Value
Prep time: 10 min
Cook time: 8 min
Serves: 4
When you want a change from basil, try this spinach-based pesto instead. It's terrific with pasta but also great as a sandwich spread or vegetable soup condiment.

Ingredients

Instructions

  • Bring a large pot of salted water to a boil (use 1 teaspoon salt). Add pasta and cook as package directs until al dente, about 8 minutes.
  • Meanwhile, in a food processor or blender, process spinach, water, oil, garlic and remaining 1/4 teaspoon salt until smooth; set aside.
  • Reserve 1/4 cup pasta cooking water and then drain pasta. Return pasta to pot; add cream cheese and stir until melted. Add pesto sauce and toss to combine, adding reserved cooking water if a thinner consistency is desired. Season with fresh lemon juice and salt, if desired. Yields about 1 1/4 cups per serving.

Notes

  • Sprinkle with freshly grated Parmesan cheese if desired. And/or stir in some roasted cherry tomatoes (could affect PointsPlus value).

Thursday, April 5, 2012

Hoppy Easter!

I saw something similar to these on Pinterest before Valentines Day. I just revamped it for Easter.  I used clean and sterlized 16 oz. water bottles.  When I sterlized the bottles, I just used very hot water, not boiling as my first attempt shrunk the plastic of the bottles!  Each bottles takes a little more than a 12.6 oz bag of M&Ms.  I used those little foam pieces you can find at any craft store for the ears.  Googly eyes and a poofy tail could be used too if so desired.  I made little tags with my niece and nephew's name and scrapped them up a little with a brand and paper flowers.  I picked out a a 7/8" springy ribbon to wrap around the bottle and a 1/8" contrasting ribbon to tie the name tags on.  Wa-la... done!

Friday, February 24, 2012

I Heart Key Lime

This past summer, my girlfriends and I stopped for drinks before heading to see Bridesmaids.  I am a huge fan of anything key lime flavored so when I saw a key lime martini on the drink menu, I was all over it.  This drink so did not disappoint.  I literally felt like I was drinking the filling out of a pie. 

When I came home, I immediately googled a recipe so I could make it at home. Most recipes I found called for KeKe Beach lime liquer.  I searched several liquor stores with no luck.  Since then, I kind of put it on the back burner, until I was at the liquor store a couple of weeks ago and I just happened to ask if they carried it.  Oh happy joy, they did! 

Now, I get to share with your!


(Libby Volgyes/The Palm Beach Post)

Emeril Lagasse's Key Lime Martini

Ingredients

  • Graham cracker crumbs, for rimming the glass
  • 2 lime wedges
  • 6 tablespoons (3 ounces) vanilla flavored vodka
  • 1/4 cup (2 ounces) key lime liqueur (recommended: KeKe Beach Key Lime Liqueur)
  • 2 tablespoons pineapple juice
  • 2 tablespoons heavy cream
  • Ice cubes

Directions

Pour the graham cracker crumbs in a shallow dish. Rub a lime wedge around the edge of a martini glass and roll the edge in the graham cracker crumbs. Chill the glass for 30 minutes or until ready to serve.
Combine the vanilla vodka, key lime liqueur, pineapple juice, and cream in a shaker. Fill the shaker half full with ice and shake until well blended. Pour into prepared martini glass, garnish with a lime wedge and serve immediately.

Wednesday, February 22, 2012

Shamrock Spritz Cookies

My dad is 100% Irish.  Every year on St. Patrick's Day, my parents have a party with a full blown Irish spread of Irish stew, corned beef and cabbage, potatoes Kilarney, red skin, and many more yummies.  About 10 years ago, I started making Shamrock spritz cookies with a recipe that I recieved years ago from The Pampered Chef.  Every year since then, I am requested to bring them!  Talk about yummy, buttery deliciousness!


Classic Spritz Cookies

Ingredients:
1 1/2 cups (375 mL) butter (3 sticks), softened
1 cup (250 mL) sugar
1 egg
1 tsp (5 mL) vanilla extract
3 1/2 cups (875 mL) all-purpose flour
Colored sugar or sprinkles (optional)
Directions:
1.Preheat oven to 375°F (190°C). In large mixing bowl, beat butter and sugar on medium speed of electric mixer about 3 minutes or until creamy, scraping down sides as necessary. Add egg and vanilla; beat well. Add flour; mix on low speed just until blended, scraping down sides as necessary. (Dough will be soft; do not refrigerate.)
2.Fit Cookie Press with desired disk (see Cook's Tip); fill with dough. Press dough onto Cookie Sheet 1 in. (2.5 cm) apart. Decorate cookies with colored sugar or sprinkles, if desired. Bake 10-12 minutes or until edges are light golden brown. Cool cookies 2 minutes on Cookie Sheet; remove to cooling rack. Repeat with remaining dough.
Yield: 6-7 dozen cookies

Nutrients per serving: (2 cookies): Calories 140, Total Fat 8 g, Saturated Fat 5 g, Cholesterol 25 mg, Carbohydrate 15 g, Protein 2 g, Sodium 55 mg, Fiber 0 g

Cook’s Tips: Do not use disk #10 for cookies. If using disk #4, see Step 5 in the How to Use section of this use and care.

Variation: Chocolate Spritz Cookies: Increase sugar to 1 1/4 cups (300 mL). Decrease flour to 3 cups (750 mL). Combine flour and 1/3 cup (75 mL) unsweetened cocoa powder in medium mixing bowl; blend well. Proceed as recipe directs.

Monday, February 20, 2012

It's Mardi Gras!

Living in the Detroit area, we generally do not celebrate Mardi Gras.  Around these northern parts, we celebrate Fat Tuesday with a little Polish treat called a pazcki.
Photo courtesy of the City of Hamtramck Website

Paczkis are what you would typically call a jelly-filled donut, but these suckers are made with lard and deep fried to the tune of about 480 calories per luscious one.  Growing up in a Polish/Italian neighborhood, every Fat Tuesday, we would preorder and get these little gems delivered from a Hamtrack bakery to my Catholic elementary school.  I grew up loving these fattening fried pieces of dough.  Fast forward to my adult life, unfortunately, my husband and kids do not share my love for the paczki.  I have tried to sway them with different flavors of raspberry, blueberry, custard, lemon, but to no avail!  It has been years since I have had one (yes, my waistline thanks me), but I still like to celebrate Fat Tuesday because after all it is the last day to indulge before 40 days of Lenten sacrifice.

I decided this year, I was going to make an attempt at the traditional Mardi Gras King Cake to celebrate New Orleans style.   Here is how my King cake turned out....


I used this recipe from the taste of home.  It is time consuming because you do have to wait an hour on two separate occasions for the dough to rise.  It was so worth the wait.  The cake is fabulously delicious!

Mardi Gras King Cake Recipe
Remember after the cake has cooled, make a slit in the bottom of the cake and hide the plastic baby.  Tradition is the person to find the baby hosts the next Mardi Gras party or bake sthe next King Cake.  We have decided that who ever finds it will have a year of good luck!

Ingredients

  • 1 package (1/4 ounce) active dry yeast
  • 1/2 cup warm water (110° to 115°)
  • 1/2 cup warm milk (110° to 115°)
  • 1/3 cup shortening
  • 1/3 cup sugar
  • 1 teaspoon salt
  • 1 egg
  • 4 to 4-1/2 cups all-purpose flour
  • 2 cans (12-1/2 ounces each) almond cake and pastry filling
  • GLAZE:
  • 3 cups confectioners' sugar
  • 1/2 teaspoon vanilla extract
  • 3 to 4 tablespoons water
  • Purple, green and gold colored sugar


Directions

  • In a large bowl, dissolve yeast in warm water. Add the milk, shortening, sugar, salt, egg and 2 cups flour. Beat on medium speed for 3 minutes. Beat until smooth. Stir in enough remaining flour to form a soft dough (dough will be sticky).
  • Turn onto a floured surface; knead until smooth and elastic, about 6-8 minutes. Place in a greased bowl, turning once to grease top. Cover and let rise in a warm place until doubled, about 1 hour.
  • Punch dough down. Turn onto a lightly floured surface; divide in half. Roll one portion into a 16-in. x 10-in. rectangle. Spread almond filling to within 1/2 in. of edges. Roll up jelly-roll style, starting with a long side; pinch seam to seal. Place seam side down on a greased baking sheet; pinch ends together to form a ring. Repeat with remaining dough and filling. Cover and let rise until doubled, about 1 hour.
  • Bake at 375° for 20-25 minutes or until golden brown. Cool on a wire rack. For glaze, combine the confectioners' sugar, vanilla and enough water to achieve desired consistency. Spread over cooled cakes. Sprinkle with colored sugars. Yield: 2 cakes (12 servings each).

Editor's Note: This recipe was tested with Solo brand cake and pastry filling. Look for it in the baking aisle.
Nutritional Facts 1 serving (1 slice) equals 227 calories, 4 g fat (1 g saturated fat), 10 mg cholesterol, 123 mg sodium, 44 g carbohydrate, 1 g fiber, 3 g protein.
Originally published as Mardi Gras King Cake in Taste of Home's Holiday & Celebrations Cookbook Annual 2007, p191

Saturday, February 4, 2012

A Problem, An Inspiration..... Wa-La!

I am self-employed and work from home.  When I made the decision back in 2004 to work from home, I had to figure out where to set up my office.  We live in a three bedroom ranch, so there was not much space for me upstairs.  I decided to put my office in our partially-finished basement.  Don't let "partially-finished" fool you though.  The space where I put my office was paneled with some cabinets and cupboards behind me, but for the most part, the basement was a cold, cinder-blocked, and tile-floored space. 

I spend six hours a day, Monday through Friday in this office.  I have been complaining for years about chronic winter sinus infections and how cold I always am.  Slippers, sweatshirts, pots of tea, and a space heater never helped.  After once again complaining about a sinus infection starting, my friend suggested that my basement was making me sick.  Really?  Maybe..... Holy crap, I bet she is right. 

I decided that I needed to find a space upstairs to move.   I decided the dining room would be the best spot.  I had a little corner in there big enough for a desk and it was "protected" enough away from the family room to work if my husband or the kids were home.  Here is the space....

After working in this space for a few weeks, I decided that I really missed my corkboard that I used to tack papers too that I need to keep at hand.  Problem is the one I have in my office was plain and ugly.  I really wanted to maintain my new office space as pretty.  I started surfing the web on how to make a fabric covered corkboard.  I came across a blog that had the perfect directions on how to do it.  So I must thank April at Funky Vintage Lovely for this tutorial and inspiration.  I did mine just slightly different, so I will walk through what I did...


Fist this is what I started with....

See, I told you, plain and ugly corkboard.  I wanted to spray paint the wood edges of the corkboard black to make it look more like a frame.  I did not tape anything off because I would just be covering the cork with fabric anyway.  I needed two coats of black satin spray paint.


Once the paint was dry, it was time to cut and add the fabric. I used Elmer's Spray Adhesive Craft Bond to attached the fabric to the cork.

Now once the fabric is tacked down to prevent fraying of the fabric and to give it a nice added touch, I bought some pretty curtain ribbon trim which I hot glued arounnd the entire perimeter.


Wa-La... the final product ready to hang...

And how it looks in my new space....

Oh yes, this is way better than working in the basement!


Thursday, February 2, 2012

"Owl" Take It

So I decided to stop in at HomeGoods and see what kind of goodies I could find today.  I left the store with a new tea cup to add to my collection.   I totally fell in love with it because I think this whole owl fad is just a "hoot".

I know it is not a traditional tea cup in the whole sense of the word, but I am not a coffee drinker and when I drink my tea, I want more than those dainty little cups that the prim and proper drink from at afternoon tea.  I drink tea all day and I want a "mug" of it. 

Getting on with it, here she is.....


Is it just sweet?  I especially love the rim of owls on the inside.  Yeah, I know, so sad that I get completely geeked over something as silly as a mug.

Tuesday, January 31, 2012

Check.....

I completed a project!  Whoo Hoo!  I really wanted to make a crepe paper wreath for Valentine's Day.  After I take my Christmas wreath down, my door is bare until Easter.  I decided that I woukd like to make a wreath for every holiday that I don't currently have.  I found this super easy crepe paper wreath tutorial on Simple Sage Designs.  I just picked some colors that I prefer and wa-la!


I am thinking about handpainting a wood heart in a filligree pattern for a corner of the the banner, but that will be something I will have to buy onmy next trip to the craft store.  

Saturday, January 28, 2012

Soup's On

We originally had lots of plans today including a basketball game of Scoop's, some antiquing for me, and a craft project with Doodle in the evening.  Plans kinda changed last night when Scoop started puking.  Yuck, yuck, yuck.  Doodle came home from a sleep over complaining of a sore throat and is now running a slight fever.  Flu season stinks! 

Since neither one of them has a big appetite, I decided to whip up a pot of vegetable beef soup.  It is on the stove simmering as we speak and it smells delish! 

Stacy's Favorite Vegetable Beef Soup


Directions:

  1. Heat vegetable oil in a large stew pot. Add the stew meat and thoroughly brown on all sides. Add red wine and deglaze pot, stirring in all the brown bits on the bottom until the wine is reduced by at least 1/2. Add the chopped onion and minced garlic and saute for about 5 minutes longer.
  2. Dump in all the other ingredients and stir well.
  3. Bring to almost a boil, then cover and reduce the heat to a simmer. Let simmer (almost bubbling), covered with the lid slightly ajar, 1 hour, stirring occasionally, until all vegetables are tender.
  4. Add more salt and pepper to taste, if desired, and discard the bay leaf.

Thursday, January 26, 2012

My Top Three

Yes, thanks to Pininterest, my creative juices are flowing.  I have spent most of my day today trying to mentally organize all the projects I want to do. To feel less overwhelmed, I have made a list of my top three to accomplish in the next week or so. 
  • I am in the middle of planning a dinner party with four of my very close girlfriends.  The cooking part is easy.  I want my menu to consist of lasagna, with my homemade, fresh noodles, Italian wedding soup, salad, bread, wine, and of course dessert.  Dessert may be birthday cake because two of the girls are celebrating birthdays in February.  This dinner menu is one I am quite comfortable with, so I can focus my attention of the pretty kind of details.  My big plan is to make my table beautiful.  In my mind, my color scheme is red and gold.  It is, after all, the month of love.  I have a gorgeous dining room table and I have gotten out of the habit of using that room for how it was originally intended, so this weekend I have made plans with my friend to go antique and thrift shopping to make the table B-E-A-U-T-I-F-U-L!  Some items on my search list are tall glass candy jars with lids to use for my table setting and unique printed red and gold plates.  I am hoping for some great finds. 
  • For my second project, my 10-year-old daughter, Doodle is going to be thirlled in helping me with.  I have always loved beautiful door wreaths.  My goal this year to to make one for every holiday season.    First up is this "too cute" Valentine's day wreath. Its a crepe paper wreath that I found on Little Tipsy.  She has included all of the step-by-step instructions.  She even noted that the she made the accessories deattachable so the wreath can be used for other "red" holidays like the Patriotic Holidays and Christmas.  Is that not genius!
  • My third project is to finish the small antique buffet table that I began stripping back in late summer.  Once the kids went back to school in September, my days went back to chaos.  Since I am in Michigan the weather cooled, I admit the project has been stalled.   The table is just sitting in the garage begging for some love.  I have to take advantage of the warmer days ahead to complete this project.  I could well use this storage is my dining room and it will be a beautiful addition to it!
So, there you have it, that is my top three creative project list.  I have tons of other ideas and projects that I have placed on the back burner.  I will continue to "pin" my my board to do at a later date.  I swear, my new love for Pininterest has simply lit my creative spirit once again, even if I am overwhelmed with all the fantastic ideas!.  This blog is my little way of sorting it all out and inspiring me to get it done. 

Wednesday, January 25, 2012

Pin It

With my new found love for Pininterest, I have decided to start blogging again.  I am inspired by my family and friends.  From craft projects to dinner parties and bunco nights to and decorating, I want to share what I love.